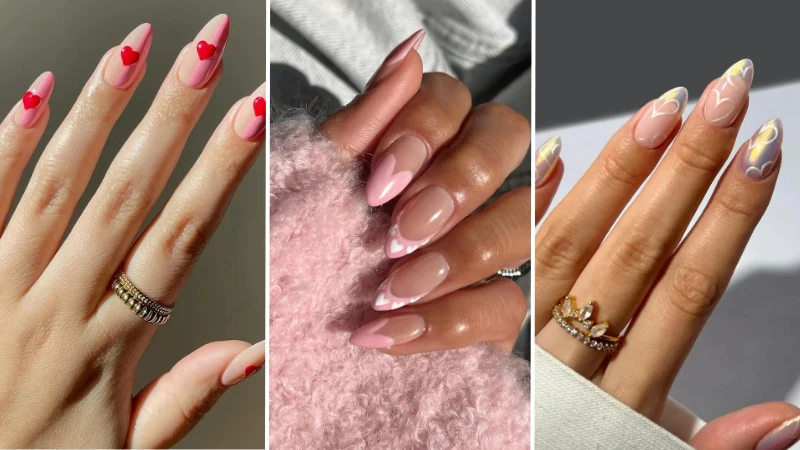
Every Valentine’s Day, the same scene plays out across thousands of Instagram feeds: perfect hearts, glossy reds, delicate glitter — and not a single word about how Valentine’s Day nails hold up through dinner, hand-washing, or a single night’s sleep. The search results are full of stunning photos, but they skip what you actually need: the prep, the application tweaks, the removal steps that stop a pretty design from becoming a chipped mess by Saturday. The difference between a DIY manicure that flakes and one that lasts is not the polish colour; it is the knowledge the photos never include.
If you work with shorter nails, you already know that designs can feel cramped and grow-out happens fast. A rounded or square shape holds up better to daily use than a pointed tip, and a minimal design with negative space hides regrowth for days. Both choices make the manicure more practical from the start.
26 Valentine’s Day Nails, From Minimal Hearts to Full-On Glitter
Here, every design is chosen with real-life wear in mind — because a manicure that looks perfect in a photo but flakes off by the next morning is no use at all. From whisper-thin heart outlines to full-coverage crimson glitter, these 26 ideas are grouped by the style you might actually wear, not just scroll past.
Subtle Hearts and Negative Space
For when you want a romantic touch without declaring it from across the room. These designs lean on sheer bases, tiny hearts, and the kind of negative space that makes regrowth invisible.
Tiny Red Hearts on Sheer Nude

by @artdecom
Long almond nails painted with a sheer, nude-toned gel base. Across each nail, tiny glossy red heart decals are placed — not crowded, just a couple per nail, so the look stays clean. The finish is high-shine glossy under studio lighting. When placing decals on gel, cure the top coat only halfway before pressing them down — full cure makes the surface too hard for adhesion. This design works on short nails too; just keep the hearts towards the centre to avoid making the nail look wider. The almond shape carries sheer finishes well — the curve stops the colour from pooling at the tip.
Iridescent Base, Soft Pink Hearts

Long almond nails with a sheer, iridescent gel base that catches the light. Light pink heart-shaped decals scatter across the surface — smaller than the ones in the first design, more delicate. The overall mood is romantic and playful, with a glossy finish that stops the shimmer from looking too loud. An iridescent base magnifies every imperfection underneath — buff the nail plate smooth with a fine-grit file before painting or you will see every ridge through the sheer polish. On medium or short almonds, scale the heart size down by half to keep the proportion flattering. The cool undertone of the base shifts subtly in different light.
Chrome Red Heart-Shaped Tips

by @disseynails
Medium almond nails with a nude base and metallic red chrome coating just at the tips, shaped exactly into a heart silhouette. The negative space between the colour and the cuticle gives the illusion of longer nail beds — perfect if you are growing out short nails. The chrome finish has a mirror-like quality that reflects daylight well. A chrome finish on the free edge wears down faster than a full-nail colour — reapply a thin layer of top coat every other day to keep the edge sealed and the mirror effect intact. This design hides regrowth so well you can stretch it to ten days on shorter nails.
Split-Colour Base, Tiny 3D Hearts

Long almond nails with a split-colour design: one side a warm nude, the other a bright bubblegum pink. At the base of each nail, a tiny raised red 3D heart charm sits near the cuticle. The glossy gel finish unifies the two halves, making the colour transition look seamless. Three-dimensional charms need a thicker gel seal around the edges — use a fine brush to cap the base of the charm, otherwise moisture seeps under and loosens the adhesion in less than three days. This design has more height than flat nail art, so type with care the first day, but it holds up to handwashing without issue once properly sealed. The split colour elongates the nail bed optically.
Crimson With Cut-Out Hearts

Long stiletto nails painted in a deep, shimmering crimson red with a glossy finish. Near the cuticle of each nail, a small heart shape in pale blush pink appears — created by leaving the negative space of the nail unpainted, then filling the heart with the pale colour. For a crisp heart outline, use a striping brush dipped in base coat to draw the shape before painting the main colour — the base coat acts as a resist and gives you a razor-sharp edge when you peel it off. Stiletto nails like this look dramatic on long length, but the same negative-space heart works on short coffin nails if you shift the heart to the centre of the nail instead.
Heart Outlines on Bubblegum Pink

Medium almond nails painted in a vibrant bubblegum pink gel. Two fingers on each hand feature small, dark red heart outlines — just the contour, with no filling. The rest stay solid pink. The contrast between the bright base and the thin, hand-drawn outline makes the design read as modern, not childish. When painting line art, use a gel with a longer working time — standard gel starts to self-level and spread before you finish the stroke if you move too slowly. This design takes five minutes per nail once you are used to the brush, and it stays fresh-looking even as the polish wears at the tips. The outline hearts are forgiving for a trembling hand.
French Tips With a Romantic Edge
French tips get a Valentine’s Day overhaul here — not the stark white lines you remember, but soft hearts, coloured edges, and metallic twists. These designs use the tip as a canvas for something more playful than a classic smile line.
Magenta Glitter Heart Tips

by @disseynails
Long almond nails with a nude base and hot pink glitter concentrated at the tips, shaped into a heart with a clear centre line. Some nails alternate with solid magenta glitter for variety. The design includes tiny white lettering on one nail — a playful touch. Glitter French tips need a thicker top coat than solid colours — the glitter particles create a rough surface that shreds thin top coat in a day, so apply two thin layers instead of one thick one. This set feels festive without being overbearing, and the nude base means the regrowth at the cuticle is barely visible for a full week. The heart tip silhouette is unmistakable in photos.
Maroon and Pink Dot Tips

Medium almond nails alternating between solid dark maroon with pink dots at the base and bubblegum pink French tips with maroon dots. The dots are evenly spaced, not random, giving a tailored look. The glossy gel finish keeps the colours saturated under daylight. For perfect dots without a dotting tool, use the blunt end of a clean bobby pin — dip it in polish, test the size on a piece of paper, then press straight down on the nail and lift vertically. This design is an easy way to stretch a basic French manicure into something with more movement — the contrasting dots distract the eye from minor tip wear. A playful twist on Valentine’s French manicure.
Burgundy French Tips With Gold Roses

Long almond nails combining deep burgundy and nude sections with metallic gold French tips. On accent nails, tiny gold roses are painted by hand, surrounded by foil accents that catch the light. The negative space at the cuticle is intentional — it keeps the elaborate design from overwhelming the nail. Hand-painted details like roses need a base of white or light nude first, otherwise the gold pigment sinks into the dark colour and loses its brightness within two days. This set leans elegant rather than cute, and pairs well with a simple gold ring — no need for extra jewellery when the nails do the work.
Red Glitter Heart French Tips

Medium almond nails with a sheer nude base and red glitter concentrated at the tips, formed into tiny heart shapes. The glitter is fine, not chunky, so the hearts read clearly from a distance. The glossy top coat mellows the texture so the glitter does not catch on cloth. When working with loose glitter on the tips, apply a peel-off base coat around the cuticle before you start — it catches the stray particles and lets you peel them away cleanly after the top coat cures. This is a design that transitions easily from dinner to a Monday meeting because the nude base tones down the sparkle. The glitter heart tips flicker under candlelight.
Pink and White Tips With Hearts

Long almond nails with a mix of bubblegum pink French tips, white tips, and negative space sections. Several nails feature heart motifs painted in contrasting colours — pink on white, white on pink. The glossy finish looks juicy under natural light. To get a crisp French tip line without guides, rest your brush hand on a flat surface and rotate the finger you are painting — the movement comes from your other hand, not the brush, and that keeps the line steady. This set takes patience, but the heart details can hide small wobbles in the tip line, so it is more forgiving than a pure colour block. The varied tip colours keep the set interesting across days.
Pink Tips, Red Heart Decals

by @bycheznails
Medium almond nails with a nude pink base and bubblegum pink French tips. Small cherry red heart decals sit on the transition line between the pink and the nude, creating a seamless bridge between the two colours. The glossy gel finish seals the decals completely. Decals applied over the tip edge tend to lift first — after top coat application, press the decal down again gently with a silicone tool and cure immediately to bond it before it separates. This design works well on short square nails too; just make the tips thinner to keep the nail bed from looking compressed. The red hearts anchor the eye right where it counts.
French Tips With Gold Charms

Medium almond nails with deep crimson tips and a sheer pale pink base. On accent nails, tiny gold charms — stars, crescent moons, and miniature roses — are pressed into the tacky gel along the tip line. The result feels like a piece of jewellery painted on. Gold charms oxidise if you skip top coat on every surface — use a fine brush to seal the underside of each charm, otherwise it turns dull grey after a few hand washes. This is the kind of design that demands a slow application, but the reward is a five-day manicure that gets more compliments than any solid colour ever will. The metallic glow against the crimson is quietly dramatic.
Multicolor Tips, Painted Hearts and Text

by @simlynail
Medium almond nails with French tips in bubblegum pink, pale yellow, and cherry red over a nude pink base. Thin line art hearts and tiny “XO” and “LOVE” texts are hand-painted across the tips. The variety across nails keeps the look dynamic. When writing letters with gel paint, write the word backwards on a piece of paper first — you will train your hand to reverse the motions naturally, and the result on the nail will be more legible. The mixed-colour tips mean you can use up leftover polishes from past seasons, and the playful text makes the design feel personal rather than store-bought. Each nail tells a fragment of a love note.
Pearl-Studded Red French Tips

Medium almond nails with bright red French tips and a glossy finish. Tiny white pearls line the smile line on accent nails, and a miniature 3D red bow sits on one nail per hand. The combination reads as classic and demure under direct sunlight. Straight out of foil removal, your nail plate is thirsty — never glue on charms before soaking in oil for five minutes, or the adhesive will pull on dry keratin and cause a ragged split when you try to remove it later. This set is for the woman who wants her French manicure to feel dressed up, not basic — the bow adds just enough whimsy without tipping into costume territory. The pearls catch light like tiny moons.
Playful Patterns and Artful Mixes
For hands that talk — these designs bring colour combinations, mixed motifs, and patterned backgrounds that catch the eye. They work best when you are in the mood to spend a little extra time on your manicure.
Cherry Red Ombré, White Heart Centre

Medium almond nails with a gradient that moves from cherry red at the tips to soft pink at the cuticle. On each nail, a small white heart sits near the base, painted freehand. The glossy gel finish softens the transition and gives the colour depth. An ombré gradient works best with a sponge-dab method, but gel sets fast — mix your colours on a palette and work one nail at a time, dabbing quickly before the gel starts to cure under room light. A red-to-pink ombré is forgiving when the tips grow out — the colour lightens naturally towards the cuticle, so the regrowth line dissolves into the gradient. The white heart acts as a bright anchor in the fade.
Marble Swirls, Tiny Heart Charms

Medium almond nails with a marble design of crimson and white swirling over a nude base. Tiny glossy heart-shaped charms press into the gel on accent nails, matching the marble’s red tone. The marbling effect looks like poured paint — each nail is unique. Use a fine liner brush to drag the marble veins while the gel is still wet — if you wait until it levels, the lines blur into a muddy mess instead of staying distinct. Marble designs hide small imperfections well; a slightly uneven swirl reads as an intentional variation, so it is more beginner-friendly than solid red. The charms add dimension without clutter.
Polka Dots and Hearts Swap

Long stiletto nails alternating between a dark burgundy base with light pink hearts and white dots, and a baby pink base with burgundy hearts and dots. The polka dots and heart motifs trade places across the nails, creating a balanced but varied set. The glossy gel finish keeps the design from looking busy. To place dots in a perfect grid, mark the centre point of each nail first with a tiny dot of clear gel — then build outward, using that point as your reference for spacing. Stiletto nails give this design room to breathe; on shorter lengths, reduce the number of motifs per nail so the pattern does not crowd the space. The colour swap trick makes it feel like two manicures in one.
Hearts, Flames, and a Smile

Long almond nails with a nude base and a patchwork of designs: bubblegum pink French tips on some nails, cherry red hearts on others, tiny flame motifs, and even a smiley face. Negative space separates the elements so the design never feels chaotic. The glossy gel finish locks everything under a smooth shell. When combining multiple painted motifs, cure each element separately — if you paint a heart next to a flame in one go, the colours bleed where they touch. This set is for someone who wants a conversation starter on her hands; each nail tells a different short story. The mix embraces imperfection with character.
Charms and Stars on Milky Base

Medium square nails with a sheer milky pink gradient that shifts from translucent to opaque. Small white hearts, bows, and star line art are hand-painted across the nails, with a few rhinestones added for dimension. The square shape frames the delicate details well, keeping the look from becoming too precious. Rhinestones lift faster on square nails because the flat tip catches on pockets and zips — use a thicker gel to cap the stone, extending the seal slightly onto the top edge of the nail for extra grip. This design works best for those who can keep their hands still for the first hour after finishing — the milkiness deepens as the gel settles. The white motifs glow against the translucent background.
Ombré Pink, Bows and Rhinestones

Long almond nails with a bubblegum pink ombré fade. Heart motifs, tiny starbursts, and bow designs are painted across the nails, highlighted by small rhinestones. The glossy finish amplifies the gold accents woven into the bows. When placing rhinestones, dip the back of each stone in a dot of builder gel, not the sweep-off gel top coat — builder gel cures harder and holds the stone in place through handwashing without yellowing over time. This is a full-on feminine set that pairs well with denim — the casual background in the image is no accident; it grounds the nail art in real life. The starbursts add a touch of whimsy to the romance.
Glitter, Chrome, and High-Shine Finishes
Reflective finishes — glitter, chrome, metallic — transform simple shapes into something that catches every ray of light. These designs use the Valentine’s Day palette of reds and pinks but push the texture into high gear.


e.l.f. Halo Glow Liquid Filter
A glow-enhancing complexion booster for soft-focus makeup looks.
Check Price on AmazonAs an Amazon Associate, Lady Lana Beauty earns from qualifying purchases.
Pale Pink Chrome, Hand-Drawn Hearts

Medium almond nails with a pale pink chrome finish that reflects an iridescent shift from pearl to lavender. Thin white hand-drawn heart outlines sit on top — delicate as pencil sketches. The chrome effect makes the white lines pop with a 3D-like glow under bright light. Chrome powder needs a tacky gel surface to adhere — if you accidentally wipe the surface clean, rub it with a tiny drop of alcohol to reactivate the tack before applying the pigment. This set reads expensive and quiet, but it requires a steady hand for the line art — trembling squiggles show up mercilessly on chrome. The finish shifts colour as you move your fingers.
Shimmer Base, Playful Love Hearts

Medium oval nails with a sheer light pink shimmer base — the kind that glows softly under indoor lighting. Small red and white hearts, hand-painted in a distinctive Comme des Garçons style with uneven outlines and a playful double-heart motif, cover each nail. The glossy top coat preserves the hand-drawn texture. Shimmer polish settles over time — before you start, roll the bottle between your palms for 30 seconds to redistribute the shimmer particles evenly; shaking introduces bubbles. This design mixes high and low perfectly: the execution is precise, but the hearts feel doodled, not stamped. The oval shape complements the organic line work.
Glitter Base With Red Heart Lines

by @simlynail
Medium almond nails coated entirely in a sparkling silver glitter gel that catches every light source. Over the glitter, thin red line art hearts are painted — the contrast between the rough glitter texture and the smooth lines gives the design depth. A few nails keep just the glitter without art for balance. Glitter polish dries to a gritty finish — always cap with two layers of a gel-like top coat that self-levels to fill the valleys between particles, or you will snag on your scarf all night. This set wins on longevity: chips and scratches hide easily within the glitter pattern, so it wears for a solid week with no touch-ups. The red lines cut through the sparkle cleanly.
Glitter Half-Moon, Dark Heart Accents

Medium almond nails alternating between deep burgundy red with a clear half-moon at the base and a shimmering dusty rose pink with a small dark heart in the centre. The glitter in the burgundy is subtle — more like a glint than a full sparkle. The half-moon zone creates an optical elongation of the nail bed. A crisp half-moon line depends on a guide sticker placed before painting — do not freehand it unless you can draw a clean arc in one motion; the foil removal method leaves a ragged edge if you hesitate. This design is ideal if you want glitter without a teenage-party feel — the dustiness of the rose pink grounds it in a quiet-luxury look.
Magenta Glitter, Vertical Black Heart

by @vviki.mani
Medium oval nails painted in a deep magenta glitter gel. On the ring finger, a milky pink base features a vertical black line with a small black heart at the tip — a graphic, minimal accent that tempers the glitter on the other nails. The contrast between the dense glitter and the bare pink nail makes the design feel intentional, not accidental. A vertical line elongates the look of short oval nails instantly — draw it with a striping brush and use a quick-dry top coat over just that accent nail to prevent smearing before you move on to the base. This set proves that one well-placed heart outshines a full set of patterned art. The black heart adds an edge to the pink sweetness.
Why Your At‑Home Valentine’s Manicure Chips In 24 Hours — And The Fix
Base coat mismatch: The biggest reason polish peels is using a base coat that fights your nail type, not cooperates with it. Porous nails (common on square and squoval shapes where the free edge exposes more keratin) drink up oil and need a bonding base to stop seepage — a regular base coat just floats on top and lifts at the sides. Ridged nails, especially almond or stiletto shapes that flex along the centre line, demand a ridge‑filler that creates a smooth, even canvas, otherwise colour cracks where the ridge peaks. Oily nail beds, often paired with round or oval tips, benefit from an acid‑free primer before the base; skipping it all but guarantees a full‑edge pop‑off the next morning.
The forgotten “tip wrap”: Sealing the free edge isn’t a salon‑only flourish, it’s the shrink‑wrap that holds everything together. Swipe horizontally across the tip with each layer — base, two colour coats, top coat — then bring the brush straight down the nail. That tiny film locks out water and prevents the tip erosion that makes short nails look ragged after two days. Most guides recommend wrapping only the top coat. I’d argue that’s the bare minimum, because each earlier layer left open at the edge becomes a channel for moisture to creep under the colour.
Thin does not mean durable: The instinct to apply paper‑thin coats to avoid bubbles often backfires. A polish film that’s too thin can’t flex with the nail; it snaps like old cellophane. The sweet spot is a self‑levelling bead — one medium drop that flows into place but still has body — so the layer cures into a supple, cohesive sheet rather than a brittle film. A base coat over colour is more than a catchy phrase: it’s the foundation that decides if your red hearts stay or fail.
Drying time myths: A fast‑dry top coat alone can’t beat dust specks and sheet marks. The real trick is two drops of cuticle oil massaged over the top coat immediately after. The oil excludes oxygen, which speeds hardening while repelling airborne fluff — your nails are genuinely smudge‑proof within four minutes instead of ten.
Water sabotage: Washing dishes or taking a long shower right after painting is a classic nail killer. Water absorption makes the nail plate swell, then contract — popping the polish like a tight lid. Wear waterproof gloves for all water exposure in the first six hours, and even then, keep the warm water as brief as possible.
How To Prep Your Nails So Glitter And Red Polish Won’t Destroy Them
Cuticle prep the night before: Push back cuticles and trim any hangnails a full 12–24 hours ahead of your manicure. Freshly pushed cuticles are oily and swollen; if you paint right after, polish bubbles up at the growth line and won’t adhere. Doing it the evening before gives the eponychium time to calm down and lets any overnight hand cream absorb completely — no slick spots to fight.
Buff without thinning: A fine buffer (240‑grit or higher) should touch only the ridge peaks, never the full nail plate. Over‑buffing creates hot spots where the nail is thinner and more porous — exactly where glitter polish will grab and stain. The conventional take is to buff to “roughen the surface,” but that misses the fact that modern base coats bond chemically, not mechanically. On almond nails, which already taper, buffing the sides weakens an already delicate structure; on square nails, buffing the corners can lead to painful corner splits.
Double‑cleanse adhesion booster: Wipe nails with pure acetone, then immediately with 70% isopropyl alcohol on a lint‑free pad just before the base coat. Acetone removes surface oils; the alcohol flash‑evaporates any residue and dehydrates the top keratin layer just enough for primer‑like grip. This is non‑negotiable under chunky glitters and red creams — anything that needs to stay stuck for five days on short nails that see a lot of hand washing.
Why strengtheners can backfire: Formaldehyde‑based hardeners make nails so rigid they can’t bend with everyday pressure — the polish cracks straight down the centre, often through the art. Switch to a flexible protein treatment instead, one that reinforces without sacrificing pliability. You want the nail and polish to move as one unit, not two brittle layers fighting each other.
Glitter stain defence: Paint a solid white or a pale pink cream as a dedicated barrier layer under every red, berry, or glitter polish. Later, when you soak off with acetone, the barrier layer lifts cleanly, taking the pigment with it and stopping that sickly orange shadow from sinking into your nail keratin. This is especially crucial for short nail Valentine’s Day ideas where every millimetre of colour counts.
What No One Tells You About Wearing Valentine’S Day Nails From Thursday To Monday
Colour shift in daylight: Pinks and reds can yellow or dull under UV exposure, especially if you’re out on a sunny Saturday date. A top coat with built‑in UV filters — look for benzophenone‑3 on the ingredient list — locks the colour vibrancy and stops that tired, greyed‑out tint by Sunday evening. I’ve watched a bright cherry French tip turn muddy orange in two days; an UV‑shield top coat would have saved it.
The grow‑out illusion trick: Designs that don’t reach the cuticle are your secret weapon. A French tip, a half‑moon negative space, or a thin gold line skimming the base makes new growth look intentional rather than sloppy. For short nails, try the short Valentine nails technique of painting a thin glitter arc right at the cuticle on day three — it masks a week’s worth of regrowth and looks like it was always the plan. A classic Valentine’s nails French tip with a soft pink base and a sharp red smile line achieves the same, hiding that gap well.
Chip triage: For a tiny corner chip, don’t repaint the whole nail. Dab a drop of matching polish with a toothpick, let it self‑level for thirty seconds, then seal only the repaired area and the free edge with a fine brush of top coat. The repair is invisible and buys you two more days. If a larger chip appears, tap a little matching glitter polish over the area — it reads as a deliberate accent, not a cover‑up.
Nightly 60‑second routine: Massage pure jojoba oil with a drop of vitamin E into the eponychium and the nail surface each night. This keeps the polish film flexible and prevents the brittle cracking that turns a micro‑chip into a full split by morning. The oil glides under the polish edge and feeds the nail from the side, like watering a plant at the soil, not on the leaves.
Waterproof your edges: Even after the manicure is fully dry, shower steam still makes the nail plate swell. Every other morning, press a fresh layer of top coat onto the free edge only — you’re re‑wrapping the tip without adding bulk to the surface. For a clean, minimal look that stays strong, minimal Valentine’s nails with simple bands or dots benefit hugely from this because any edge wear stands out immediately.
Undoing The Night: How To Remove Stubborn Valentine’s Glitter Without Taking Your Nails With It
Acetone type matters: Pure acetone — the plain, harsh‑smelling kind, not the pink conditioning remover — is the only thing that dissolves glitter’s adhesive matrix quickly. Non‑acetone removers don’t break the bond; you’ll scrub and scrape and end up with flaky nail layers. For gel‑based Valentine’s designs, no‑acetone is a waste of time and nail health.
The 15‑minute foil rule: Soak a cotton ball with pure acetone, place it directly on the nail, wrap tightly in aluminium foil, and wait a full 15 minutes per hand. Don’t peek. After unwrapping, push gently with an orange stick — if the glitter doesn’t slide off in one sheet, re‑wrap for five more minutes. Peeling early lifts the keratin sheets underneath, leaving white patches that take weeks to grow out.
Warm‑water soak for heavy coats: For dip powder accent nails or multiple layers of gel top coat over chunky hearts, place the foil‑wrapped fingertips in a bowl of comfortably warm water. The gentle heat speeds solvent penetration without the skin‑drying effect of hot water poured directly onto bare hands. This is especially helpful for the dense glitter on a cherry nail art accent, where a warm soak halves removal time.
Post‑removal moisture emergency: Immediately after removing, soak nails in pure jojoba oil for five minutes. Acetone strips the intercellular lipids; jojoba, which is nearly identical to human sebum, rushes those lipids back in. Follow with a ceramide‑rich hand cream massaged into the nail folds. Skip this, and the nail bed will feel thin and papery under the next manicure.
The 12‑hour rest rule: Don’t repaint right away. Nails need half a day to rehydrate, re‑flex, and return to a normal pH after the solvent attack. A fresh coat over dehydrated nails will crack within a day, no matter how expert your application. Let them breathe — then start again with that perfect base coat.
[Bonus] The 3 Products Every Valentine’S Day Nail Kit Needs (That Aren’t Polish)
An UV‑blocking flexible top coat: Look for ethyl acetate and benzophenone‑3 on the label — those shield colour and let the film move with your nail.
I care more about how a manicure survives a weekend than how it photographs fresh. A rigid top coat cracks by Sunday when your nail flexes under warm water. One that bends stays intact. Apply it not just over the surface but directly onto the free edge — that edge seal is what stops the tiny lifts that turn into full chips.
A cuticle serum pen with squalane and vitamin E: Stash one in your handbag for mid‑date emergencies.
A dry, lifting cuticle catches on everything and ruins the polished look before dessert. A brush‑tip pen lets you press a tiny bead of oil exactly where the skin meets the nail, smoothing it invisibly. I’ve used mine to tame a micro‑chip before anyone noticed — it fills the gap just enough to stop it catching on fabric.
A fine‑tip clean‑up brush dipped in pure acetone: When you’re doing DIY Valentine’s Day nail art, a trembling hand is normal. This tool fixes it instantly.
A short, flat synthetic brush corrects the edges of a wonky heart or wipes away a smudge without flooding the cuticle. Keep it nearly dry — too much acetone thins the surrounding polish. One clean sweep and the line is crisp again.
A glass nail file with 240‑grit or finer: Cheap emery boards leave micro‑splits that invite water and chip the polish. Glass seals as it shapes.
After a few days, square corners catch on everything — a quick pass with the fine side reshapes them without sacrificing length. I keep one in my desk drawer for Wednesday touch‑ups when the free edge starts to feel rough against my sleeve.
Pure acetone in a pump dispenser: The pink conditioning removers simply don’t break down glitter or gel fast enough, which leads to scraping and nail damage.
A pump bottle on your vanity makes removal feel like half the effort. One pump onto a lint‑free pad, wrap in foil, and wait. You’re not chipping away at the design and you’re not soaking your skin in diluted mixes that drag out the process.
FAQ
Will red nail polish stain my nails permanently if I wear it for a week?
Staining is superficial and sits only in the top keratin layer. Always use a base coat with a slight tint — a peachy or white base blocks pigment from sinking in. If staining happens, a paste of baking soda and water gently rubbed over the nail removes the orange tint without thinning the plate.
Is it tacky to have obvious Valentine’s Day nail art after February 14th?
A single tiny heart accent or a pink‑and‑red ombre reads as late‑winter chic. Full‑cover glossy hearts and letter motifs look dated. If you feel self‑conscious, add a coat of sheer nude polish to mute the design — it fades into a soft blush that works for the rest of the month.
Can I use regular polish instead of gel for heart designs without them smudging?
Yes, but layering is everything. Let the base colour dry completely, then use a striping brush loaded with slightly thicker polish to draw the heart. Seal it by floating a fast‑dry topcoat brush without dragging it across the art. This keeps the heart sharp and untouched.
What if my date notices my chipped nail — how can I avoid that anxiety?
Carry a mini matching polish and a fine dotting tool. Fill the chip with a tiny drop, let it self‑level, then dab clear topcoat only over the repair. For a larger chip, tap a little glitter polish over the spot — it looks like a planned accent and masks the damage instantly.
Is it safe to get a gel manicure every two weeks just for holiday designs?
Frequent gel can thin nails if removal is rushed. Always have them soaked off — never peeled — and give your nails a full seven‑day break between sets with daily oil treatments. A strengthening treatment with hydrolysed keratin restores flexibility before the next application.
I have short, wide nail beds — which shape keeps Valentine’s nail art from looking stubby?
Almond lengthens the hand and makes a tiny heart look delicate; it needs a slightly stronger free edge so build it with gel if you can. Square with softly rounded corners holds a French tip or a half‑moon design neatly and stands up to typing. Round short nails are the most practical — a single accent dot on each ring finger keeps the look intentional without clutter. For more ideas that suit a small canvas, short nail designs that still feel chic guide you through smart space use.