You know the feeling: you spent an evening on that cherry nail art — the perfect red, the tiny stem, the glossy finish — and by day three it’s chipped along the cuticle or the highlight has smeared into a blur. The problem isn’t your hand. Most guides show you the gallery but skip the real execution: how to make the shapes stay, how to prep so the pigment doesn’t lift, and how to remove it without wrecking the nail underneath. That’s what this article is about.
For more ideas that hold up through the humidity, browse our summer nails roundup, and if your nails are shorter, these cherry designs work especially well on short summer nails.
26 Cherry Nail Art Ideas to Match Your Mood This Summer
From barely-there hand-painted cherries to full-glam party sets, these 26 cherry nail designs sort themselves into how you actually want to wear them — not just how they look in a studio light. If you’re after more seasonal inspiration, our summer nails gallery has bright, fresh looks that feel just as considered.
The Sheer & Simple Set
For me, a sheer base is the unsung hero of nail art — it grows out invisibly and lets a tiny hand-painted cherry do all the work. These designs keep the base clean and let the motif do the talking.
Soft Oval with Tiny Hand-Painted Cherries

An oval medium nail shape keeps the silhouette gentle — exactly what a design this fine needs. A sheer light pink base covers the plate like a wash of watercolour, and the cherry sits near the centre of each nail, not crammed against the edge. The red is a true cherry red, not orange or berry, and the olive green stems are drawn with a detail brush — hold the brush at a 45-degree angle for the stem curve, otherwise you’ll get a straight line that reads more stick than stalk. Two glossy top coats seal the design without dragging, and because the base is sheer, regrowth stays hidden for days longer than an opaque nude would.
Almond Nude with Single Cherry Focus

This almond shape in medium length gives you enough room to place a cherry without the nail feeling crowded. The nude base is chosen to match the skin tone closely — it disappears, and the cherry becomes the only punctuation. Red and green are kept mute, not neon, so the whole thing reads more French Riviera than carnival. A spot of cuticle oil twice a day stops the nude base from yellowing, which is especially noticeable with red art nearby. The glossy finish reflects light softly, and because the cherry is painted directly with gel, there’s no raised edge to snag on hair or fabric.
Textured White French with a Single Cherry

Here the French tip isn’t your standard glossy arc — it has a textured white finish, almost like a fine knit, that adds depth without glitter. The nude base underneath stays sheer, and a single cherry illustration sits near the tip on one or two accent nails. The proportions work because the white texture crowns the almond shape, drawing the eye upward. When doing a textured tip, use a detail brush to apply the white gel in short strokes before curing — laying it on thick in one go leads to pooling and an uneven edge. The cherry red is just bright enough to hold its own against the textured white, so nothing fades into the background.
Lime-Tipped Almond with Cherry Negative Space

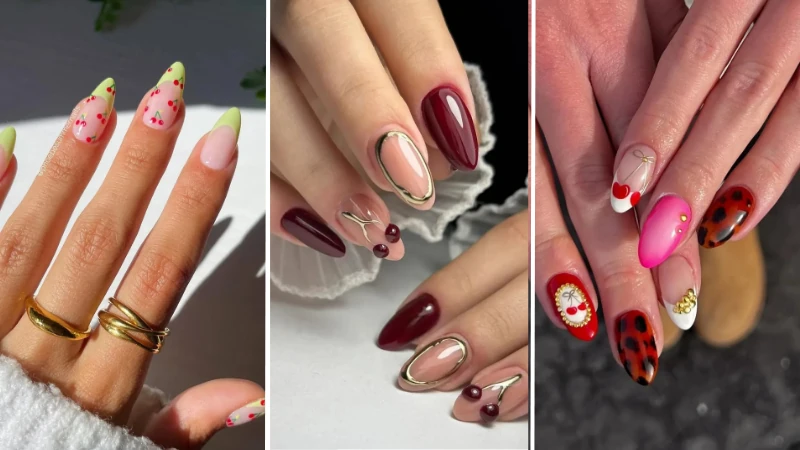
An almond long nail with a sheer light pink base and a pale lime green French tip is already a conversation starter, but add a hand-painted cherry on the negative space and you have a design that feels graphic without trying too hard. The cherry red is concentrated, not watered down, so it stands out against the light tip. Negative space designs show every bit of natural nail oil — dehydrate the plate twice before you start painting, or the gel lifts within a day at the free edge. The lime green is soft, almost pastel, which keeps the whole look playful but not loud. A high-gloss top coat locks the art and smooths the transition between natural nail and polish.
Gold-Framed Cherry on Burgundy and Nude

by @nidianailss
This set mixes deep burgundy solid nails with nude bases that have gold-outlined frames and tiny cherry motifs inside. It reads refined because the gold frames make you focus on one small detail at a time. The almond medium shape keeps the proportions balanced — long enough for the frame, not so long it looks like a door. A thin liner brush with a long bristle (7mm or more) makes painting gold frames faster — short bristles drag unevenly and pull the gel into blobs. The cherry inside the frame is hand-painted in a true red, and the negative space around it prevents the nail from feeling heavy. It’s a design that works for evening but still looks intentional the next morning.
French Tip Favourites
A French tip with a tiny cherry is the easiest way to make a classic feel summery — here, the tips range from crisp white to soft sky blue, but the cherry always stays small and deliberate. For even more warm-weather twists on the classic French, our French tip summer ideas are full of practical colour combos.
Classic White French with 3D Cherry Accents

Almond long nails with a sheer nude base and bright white tips look clean on their own, but the 3D cherry on the accent nails turns it into something you’ll get asked about. The cherry is built with a clear gel sculpt, then painted red and topped with a glossy coat — it has that glass-like depth you can’t get from flat paint. 3D elements catch on everything — seal the edges with a thin layer of no-wipe top coat right over the whole nail to fuse the cherry to the base and prevent lifting. The sheer nude keeps the look from becoming top-heavy, and the white tip stays crisp. Gold rings complete the put-together feel, but the nails do the heavy lifting.
Square Medium with Cherry and Heart Combo

Square nails with a medium length give you a flat canvas, so the French tips in cherry red and bubblegum pink land straight across without curving. One nail keeps a clear base with a hand-painted cherry and a tiny heart — a pairing that feels sweet without sliding into saccharine. On square shapes, avoid wrapping the sides of the free edge with the red tip colour — the corners chip faster, and the design looks messy after two days. Keep the colour on the top plane only. The mix of solid red nails and French tips means you get variety without needing ten different tools. A glossy gel finish makes the pink tip look like hard candy, and the red cherry ties everything together.
Coffin-Shaped Sky Blue Tips with Fruit Charms

This coffin medium set pairs a sheer nude base with sky blue French tips and tiny 3D fruit charms — a cherry, maybe a lemon slice, and a little red berry. The blue is bright but not neon, so it works against all skin tones. The 3D charms sit near the smile line, not on the tip edge, so they don’t interfere with typing. Press-on 3D charms need a dual-ended adhesive — one dot of gel on the charm base, cure it, then a second dot to seal, or they pop off in the shower. The coffin shape keeps the silhouette modern, and because the base is nude, the whole design looks airy. It’s the set you pack for a beach holiday and forget to touch up for a full week.
Square Sky Blue Mix with a Hidden Cherry

This square medium set isn’t all French tips — one nail is solid sky blue, another sheer nude, and a third has a blue French tip, but the star is the accent nail with a painted cherry on a sheer base. The cherry is tiny, not much bigger than a grain of rice, and placed near the cuticle so it surprises you. When painting a cherry this small, thin the red gel slightly with no-wipe top coat — full-strength gel domes too much and loses the delicate shape. The sky blue is cool-toned, which keeps the red from feeling wintery. A glossy finish ties the mixed finishes into one cohesive set, and the square shape stops it from looking too precious.
Mint-Tipped Almond with Cherry Detail

Almond medium nails with a nude pink base and a mint green French tip feel like a gelato flavour on your hands. The cherry sits on the ring finger, painted right at the smile line where the mint tip meets the nude — it anchors the look without taking over. The mint is cool and milky, not toothpaste-green, and the red cherry provides the exact warmth the design needs. If you’re mixing gel colours yourself, add a speck of white to the mint to keep it from turning pastel neon — pure green pigment can look jarring on warm skin tones. A high-shine top coat smoothes the transition between the tip and the cherry, and because the nails are medium length, they won’t turn into claws by day four.
Colour & Pattern Play
Cherries don’t have to stand alone — here they meet plaid, gingham, leopard print, and graphic spots, all held together by a sharp almond or oval shape. These pattern-heavy cherry designs feel right at home with the bright summer vibes we’ve been seeing everywhere.
Ruby Glitter French with Cherry Art

Glitter and a French tip can feel dated, but this almond medium set makes it modern by using a ruby red glitter only on the tips, not across the whole nail. The rest of the nail is either a solid glitter red or a clear base with painted cherry motifs. The cherries are tiny, almost like sequins, and the green stems are drawn with a steady hand. Glitter gel cures thicker than regular gel — extend the curing time by 15 seconds, or the base coat underneath stays soft and causes chipping at the smile line. The mix of finishes — glitter, high-gloss clear, and matte cherry red — creates depth without bulk. A plain silver ring grounds the look, but the nail art does the shining.
Plaid Almond with Cherry French Tips

Long almond nails get a full plaid treatment in crimson and white, then the French tip gets a cherry motif — the cherry sits right on the white tip, so it’s as if the fruit is resting on a tablecloth. The plaid pattern is hand-painted, not stamped, which gives it a soft, textile-like look. Plaid painting needs a flat gel brush with a sharp edge — a standard round brush won’t give you those crisp intersecting lines, and the pattern bleeds into a blur. The nude base on the reverse nails balances the pattern so the whole set doesn’t scream. A glossy top coat flattens the texture, and the almond shape keeps it from looking boxy. It’s the design you wear to a picnic and photograph endlessly.
Spotted Burgundy and Cherry Accents

This almond medium set mixes deep burgundy French tips, a brown spotted pattern that reads almost like animal print spotted, and a single accent nail with a hand-painted cherry on a nude base. The spotted pattern is done with a dotting tool — small and irregular, not perfect circles — which keeps it organic. A true ball-end dotting tool gives you an even circle every time; a blunt taper stamp creates ovals and messy edges, especially on curved nail surfaces. The cherry red ties into the burgundy, so nothing clashes. A glossy finish makes the brown spots look like polished wood, and the nude base on the accent nail keeps the design from feeling heavy. It’s moody but still summery.
Gingham Green French with Cherry Illustrations

Oval medium nails wear a sage green and white gingham pattern across some nails, while others get a French tip with the same green. Tiny red cherry illustrations dot the design, placed where you’d expect a bow or a pearl — it’s quaint without being twee. The gingham is drawn with a thin detail brush, crosshatching white over a sage base. Gingham on nails works only when the white lines are thin and semi-transparent — opaque white gel sits on top of the base rather than blending, and after two days it looks like a sticker. The oval shape softens the geometric pattern, and a glossy top coat fuses the layers. It pairs well with a white linen shirt and a farmers‘ market coffee cup.
Leopard French Tip with Cherry Accent

Here the French tip isn’t solid colour — it’s outlined in cherry red and filled with a leopard print in deep brown and black. The rest of the nail stays sheer nude, with one nail featuring a small hand-painted cherry. The mix makes the design feel like two manicures at once: refined animal print and playful fruit. Leopard spots that look natural need a jagged edge, not a smooth blob — use a fine brush and tap, don’t drag, to get that organic shape. The sheer nude base is essential for lightness — a full-coverage nude would weigh it down. Medium almond shape keeps the balance, and a no-wipe top coat stops the red outline from bleeding into the clear area during curing.
Maximalist Tortoiseshell with Gold and Cherry

Almond medium nails get the full treatment: tortoiseshell pattern in dark brown and caramel, bright red solid nails, bubblegum pink accents, and white nails with gold studs and a framed cherry motif. It’s busy, but the almond shape keeps it from spilling over. The gold bows and studs are applied over the finished nail, then sealed with a thick top coat. When placing multiple gold charms, lay them out on a silicone mat first to check spacing — once they’re on the nail, repositioning creates bubbles in the top coat. The cherry inside a gold frame is the focal point, and because it’s surrounded by so much texture, a single cherry holds its ground. This set is for when you want your nails to match a printed silk dress and a bold lip.
For the Party Crowd
When the dress code calls for extra, these cherry designs bring gold bows, pearls, rhinestones, and deep red hues that catch the light. If the pearl and gold details here feel romantic, our Valentine’s Day nails have more soft, pretty looks that use similar embellishments.
Gold Bow and Cherry on Sheer Almond

Long almond nails with a sheer nude base feel barely polished until you spot the gold bow charms and tiny white dots framing each cherry motif. The cherries are hand-painted in a rich red, with the stems drawn in a fine line. The gold bows sit at the cuticle edge like a jewellery detail, so the whole nail reads elegant rather than crafty. Gold charms thin enough to bend to the curve of the nail — if they’re flat-backed and rigid, they lift at the sides within a day, no matter how much top coat you pile on. The white dots are placed with a dotting tool, alternating small and tiny to create a scattered effect. A glossy finish ties the elements together, and the sheer base keeps it from looking like a Christmas decoration.
Ombré Pink and Burgundy with Crystal Cherries

This almond long set mixes a solid dark burgundy nail, a soft pink base with cherry and bow illustrations, and an ombré pink-to-burgundy tip. Tiny rhinestones line the smile line or accent the cherry — it’s a proper evening look. The ombré is done with a sponge dab, blending soft pink into burgundy so the transition is seamless. Rhinestones on the smile line need to be set slightly into the wet gel, not floated on top — if they sit above the surface, the edge catches on everything and you lose stones within a day. The cherry illustration is miniature, so the overall effect stays delicate despite the drama. A high-gloss top coat seals the stones and makes the ombré look like glass.
Red Glitter Ombré with Pearls and Cherry Art

Bright red glitter builds from the cuticle to a dense sparkle at the tip on these almond long nails. The cherry motifs are painted over the glitter — which takes a steady hand because the texture tries to drag the brush — and small white pearls add a polished contrast. The ombré effect keeps the glitter from looking uniform; it’s darker at the free edge and softly fades toward the nail bed. Red glitter gel stains the natural nail more than any other colour — always use a bonder base and don’t skip it, or you’ll need a stain remover soak after removal. The pearls are placed asymmetrically around the cherry, so the design feels balanced but not symmetrical. A thick gloss top coat smooths the glitter to a glass-like finish.
Soft Pink Almond with Pearls and Cherry Accents

by @mydumbnails
These almond long nails combine soft pink and sheer nude bases with hand-painted cherries, delicate white pearls, and tiny gold studs. The pearls are clustered at the base of the cherry like a small necklace, and the gold studs break up the pastel so it doesn’t read too sweet. Pearls on nails need a gel top coat that specifically adheres to non-porous surfaces — standard top coat slides off the pearl’s smooth surface, leaving a window for water to lift the whole thing. The cherry red is a true, slightly blue-toned red that works against the pink, and the stems are painted with a detail brush in a single uninterrupted stroke. A glossy finish seals everything, and the long almond shape gives the design room to breathe without overcrowding.
Deep Red Animal Print with Cherry Highlight

Almond long nails start with a sheer nude base and a deep red French tip, but then the animal print in dark brown and black takes over half the nail. The cherry motif is hand-painted on the ring finger, sitting on the nude space next to the print. Gold rings, including a chunky chain-link style, frame the hands. Animal print over a French tip should be applied after the tip is cured and wiped with alcohol — otherwise the uncured inhibition layer makes the print slide during painting. The sheer nude keeps the design from looking stuffy, and the deep red ties the print and cherry together. A high-shine top coat evens out the texture so the animal print doesn’t feel raised.
The Fun, Quirky Set
I don’t believe nail art has to be serious — a lime green tip with a rhinestone cherry makes me smile, and that’s reason enough to wear it. These cherry designs don’t play it safe, and they’re all the better for it.


e.l.f. Halo Glow Liquid Filter
A glow-enhancing complexion booster for soft-focus makeup looks.
Check Price on AmazonAs an Amazon Associate, Lady Lana Beauty earns from qualifying purchases.
Yellow-Tipped Almond with Cherry and Rhinestones

A pale sheer pink base lets a bright yellow French tip pop without looking harsh. The cherry sits on a couple of accent nails, and tiny rhinestones catch the light at the cuticle. The yellow is pure egg-yolk yellow — warm, not highlighter — so it flatters rather than fights the red cherry. Yellow gel pigment is notoriously sheer; three thin coats cure far better than one thick one that stays soft underneath and peels in sheets. The rhinestones are placed singly, not in a cluster, so they feel like a detail rather than a statement. Medium almond shape gives the yellow tip a curved, graceful line, and a glossy top coat makes the whole thing look like a boiled sweet — in the best way.
Deep Red French Tips with Cherry Jewels

Almond long nails with a sheer light pink base and deep red French tips get a cherry motif that’s built from tiny red rhinestones rather than paint. The gems give the cherry a faceted, almost 3D look without the bulk of a full charm. Rhinestone cherries need the smallest gem sizes (ss3 or ss4) — any larger and the circle shape turns into a blob that looks like a button, not a fruit. The deep red tip is almost oxblood, which makes the design feel more evening than brunch. Green stems are painted in a thin line from the gem cluster. A thick glossy top coat locks the stones in place, and because the base is sheer, the whole look stays light enough for a dinner out.
Lime Green French with Rhinestone Cherries

Light pink base meets a lime green French tip that’s bright without being fluorescent — it’s the green of a Granny Smith apple. The cherries are made of red rhinestones, applied over the pink base just below the smile line. The colour combo is unexpected, but the pink softens the lime so it doesn’t scream. Green and red together can look like Christmas if the tones are too deep — stick to a blue-based red and a yellow-based green to keep it firmly in summer. Almond long nails give the lime tip a graceful arch, and the rhinestone cherries sit flat because they’re set into a thin layer of clear gel before curing. Two coats of top coat later, the surface is smooth as glass.
Metallic Pink Almond with Cherry Accents

Nude base, almond long nails, and a French tip that’s pure metallic pink — almost like a foil finish. The cherries are red rhinestones with tiny painted green stems, placed near the smile line. The metallic pink catches the light differently as you move your hand, so the cherry seems to shift in and out of attention. Metallic gel polishes show brushstrokes more than cremes — use a long, flat brush for the tip and work in one horizontal stroke, no back-and-forth, or you’ll see every drag mark after curing. The nude base is a true neutral, not peach, which keeps the pink from veering into bubblegum. A glossy top coat seals the rhinestones and gives the metallic tip a liquid-metal shine.
Black-Tipped Almond with Graphic Cherry Art

by @karebeauty_
Almond long nails alternate between solid gloss black and a nude base with a black French tip. On the black-tipped nails, a tiny red cherry illustration sits right where the black meets the nude — it’s graphic, sharp, and entirely un-fussy. The black tip is deep and opaque, so the red cherry reads as a pure pop of colour. Black gel cures hot — layer thin coats and pause for a few seconds between curing to let the heat dissipate, otherwise you can feel a burn and risk lifting at the cuticle. The solid black nails provide visual resting points among the pattern, and the almond shape keeps the whole hand looking elongated. A high-gloss top coat makes the black look like patent leather and the cherry like a fresh berry.
The DIY Kit Every Woman Needs for Cherry Nail Art
Fine-detail brush: A 5/0 round brush is the one tool you cannot skip. Most drugstore nail art kits include a striper brush that’s far too thick for the tight, curved shape of a cherry. A proper detail brush lets you place the red circle and the tiny highlight with control so the motif stays crisp instead of bleeding into a blob.
Silicone nail art mat: Practise the cherry shape ten times on a mat before you ever touch your nail. The mat gives you unlimited attempts without acetone or frustration. You can try different stem angles and highlight placements, then just peel off the dried practice art. It removes the design anxiety that makes your hand shake at the last second.
Gel paints with high pigment load: Brands like The GelBottle or Madam Glam make cherry-specific reds that cover in one thin coat. When you need three layers of a sheer drugstore red, the motif gets thick, takes forever to dry, and smudges more easily. A single opaque coat keeps the art flat and reduces the bulk that catches on fabric. For those leaning into a full summer look, picking the right summer base shade under the cherry makes the red pop without extra layers.
Dotting tool with a true ball end: Many inexpensive dotting tools have a blunt taper that flattens the highlight into a messy oval. A polished round ball end creates the precise white reflection dot that makes the cherry read as glossy and three-dimensional. Look for a tool where you can feel the ball roll under light pressure.
No-wipe top coat or fast-dry alternative: Cherry art smears the moment a slow top coat drags the still-wet pigment. For gel, a no-wipe top coat cures without a sticky layer to disturb the design. For regular lacquer, a toluene-free fast-dry top coat floats over the art instead of tugging at it. Old-formula top coats are the hidden reason your cherries look beautiful for five minutes and then blur.
Why Your Cherry Manicure Chips Faster Than You Think
Most articles blame the top coat. I’d argue the base coat is the real first line of defence, because dark cherry red pigment oxidises faster than lighter colours, making the film brittle without a bonder underneath.
Bonder base coat: Cherry red polish contains high levels of pigment that degrade under UV and everyday wear. A bonder base like Orly Bonder grips both the nail plate and the colour, preventing the micro-cracks that start along the edges of the design. Standard base coats simply sit there; a bonder actively holds the layers together.
Wrapping the cherry edges, not just the free edge: The instinct is to cap the nail tip only, but the tiny strokes of the cherry motif leave edges that lift at the sides. After painting the cherry, take a thin brush loaded with top coat and trace the entire perimeter of the red shape, sealing it to the nail. This stops the catching that happens when you pull on a pair of jeans or rummage through a bag.
Phone pressure after application: Tapping your nails on a screen concentrates force right onto the cherry centre while the polish is still curing. Use a capacitive-tip stylus for the first 24 hours, especially if you reply to messages all day. Even gel that feels hard to the touch continues to cure and harden for a full day.
Reinforcement top coat every third day: Don’t wait for visible wear. Every three days, add a fresh thin layer of top coat across the entire nail, not just the design. This seals the cherry and the surrounding polish together, preventing flaking that starts from the edges of the art. It’s the easiest trick most home manicures skip.
Water exposure in the first 24 hours: A single long shower or a sink full of dishes can soften the base lacquer under the cherry. Even quick-dry polish continues to harden for a full day, and water absorption expands the nail, creating hairline fractures in the pigment. If you want durability, time your manicure so that you avoid soaking your hands for a full day afterward. For shorter nail beds, keeping short summer nails protected during that window is even more important because the design sits closer to the edge.
How to Shape and Prep Nails So Cherry Art Looks Professional
Almond and oval shapes: These shapes create a natural pedestal that elongates the cherry motif. The tapered free edge mirrors the curve of the cherry, making the design look intentional and polished. Square and squoval shapes often crop the stem abruptly and make the art appear blocky, especially on shorter fingers. If you have wide nail beds, almond visually lengthens the hand without needing extreme length.
Cuticle removal as prep, not just grooming: Invisible cuticle remnants left on the nail plate are the most common cause of lifting. Cherry polish bonds to the dead skin layer rather than the keratin of the nail, and within days the edges curl up. Apply a liquid cuticle remover, gently push back with a pusher, and then wipe the plate completely clean. The art then sits on a surface that holds, not one that sheds.
Selective buffing for regular lacquer: You don’t need to buff the entire nail. Lightly pass a 240-grit buffer only over the centre third of the nail plate, exactly where the cherry will sit. This creates micro-grooves that give the pigment grip without thinning the nail. Full-surface buffing weakens the nail tissue over time and offers no advantage for a small motif.
pH-balancing prep pads: For gel cherry nail art, swipe a pH bond product across bare nails before the base coat. The product removes residual oils and creates a slightly tacky surface that gel adheres to. Without it, red gel often lifts right at the cuticle line, and the bright pigment makes that lifting immediately obvious. This extra step is especially vital for those with naturally oily nail beds.
Dehydrate with isopropyl alcohol: Even natural oils from touching your hair or face can form a slip layer that causes stickers or stamping to slide during placement. Before applying any cherry decal or stamp, wipe each nail with pure rubbing alcohol. The surface must be completely dry and oil-free for the design to transfer cleanly and stay put. I’ll say it plainly: the shape matters more than the length for cherry art. An almond or oval gives you professional proportion even on nails kept short. If you’re looking for more shape ideas that work with fruit motifs, short summer nails often rely on these elongating curves.
The Removal Method That Doesn’t Ruin Your Nails After Cherry Designs
Pure acetone soak with foil wraps: Peeling off cherry gel by hand tears layers from your natural nail plate. Soak a cotton ball in pure acetone, place it directly on the nail, and wrap tightly with plastic-backed foil clips. Leave it for 12 to 15 minutes. The gel will soften enough to slide off with an orange wood stick. No scraping, no prying.
Oil-soak trick for glitter cherry accents: If you added glitter to your cherry art, wet a cotton pad with cuticle oil, press it onto the nail for one minute, then wipe. The oil dissolves the glitter adhesive faster than acetone alone and conditions the nail at the same time. This prevents the rough friction of trying to scrub off stubborn sparkles.
Gentle buffing for leftover gel: After removing the wrap, a tiny speck of red gel sometimes remains. Use a 180-grit buffer, but only on that spot and only with horizontal strokes. Vertical filing tears the nail plate’s keratin layers. Work slowly and stop as soon as the remnant is gone—over-buffing is the fastest way to create thin, flexible nails that break.
Yellow-pigment correction: Cherry red pigments can leave a yellow stain on natural nails, especially if you wore the colour for two weeks straight. Once the art is off, apply a buffing cream containing kojic acid or soak nails in a professional stain remover. This returns the nail bed to a neutral tone before your next manicure, so pale bases don’t look muddy.
Sticker removal technique: Never pull a cherry sticker upward. Saturate a cotton round with warm water, hold it on the sticker for 30 seconds to soften the adhesive, then slide the sticker horizontally off the nail. Pulling upward lifts layers of the nail plate along with the sticker. A gentle slide keeps the surface intact. After removal, give your nails a rest week if you can; even the best techniques leave the nail slightly dehydrated, and the next manicure performs better on replenished keratin.
A 5-Minute Refresh for Cherry Nail Art That’s Already Grown Out
Taper the free edge: File the tips into a slightly more pointed almond or oval silhouette, removing just the very edge.
You shorten the visible regrowth without touching the design itself. A more tapered shape pulls the eye inward toward the cherry, making the gap at the base feel intentional rather than overdue. This works especially well on nails that already had an almond foundation—one gentle pass with a 180-grit file is all it takes.
Float a jelly tint over everything: Choose a sheer pink or peach jelly polish and apply one thin coat across the whole nail, design included.
This veils the regrowth line and gives the cherries a glossy, candied depth that looks like a planned summer jelly manicure. The key is a truly translucent formula—Cirque Colors makes one I reach for because it never clouds the red pigment underneath. A single coat is enough; two would muddy the motif.
Spot-touch the cherry edges: Dip a fine 5/0 detail brush into your original cherry red and paint only the outermost bits where wear is visible.
No need to repaint full circles or redo stems. Chipping almost always starts at the fruit’s outer curve, so hitting those tiny sections with fresh colour makes the hands look crisp again. Let that touch-up dry for a full two minutes before top coat—moving too fast drags the pigment right back off.
Seal with a quick-dry art top coat: Use a polish like Seche Vite that’s built to harden over fine details without smudging.
Float the brush on a generous bead, never let bristles touch the cherry directly on the first pass, and cap the free edge. This locks the refresh and adds the kind of high shine that fools people into thinking you sat for a hour. Reapplying this type of top coat every fourth day extends the look even further.
Warm a drop of cuticle oil: Rub it between your fingers before pressing it along the nail folds and the regrowth zone.
After a week, cuticles look dry and that makes the whole manicure read as older than it is. A warmed oil—jojoba or squalane-based—sinks in faster and subtly plumps the skin, bridging the visual gap between the nail bed and the grown-out art. I do this after every refresh; it costs seconds and changes how polished the hands appear.
FAQ
What nail shape helps cherry nail art look tidy on short fingers?
Almond or oval elongate the hand and create a natural pedestal for the cherry, so even a tiny motif doesn’t crowd. Squoval is the practical choice if you type a lot—it keeps the free edge strong and the cherry sits stable without catching on fabric. Avoid very square tips with cherry art; they cut off the stem abruptly and make the whole design feel blocky on short nail beds. For more on making short lengths work, our guide to practical short summer nails shows how shape changes the proportion.
What if my cherry design smudges when I apply top coat?
That nearly always means the bristles dragged across still-wet art. Lead with the bead of top coat and keep the brush parallel to the nail—let the liquid glide first, the bristles follow. If you need to go back, wait sixty seconds and apply a second floating layer rather than trying to fix it wet.
How do I remove cherry nail stickers without peeling my nail layers off?
Never pull upward. Soak a cotton round in warm water, hold it on the sticker for thirty seconds, then slide the sticker horizontally off the nail. The adhesive softens without taking keratin with it. Afterward, wipe with isopropyl alcohol to remove any leftover residue before you oil the nails.
Will cherry nail art make my hands look old-fashioned or childish?
Not when you keep the execution refined. Pair a deep oxblood cherry with a skin-tone nude base and a high-shine top coat—it reads French Riviera polish, not cartoon. The simpler the stem (one fine line, no leaves), the more refined the result.
Is gel or regular polish better for DIY cherry nail art?
Gel gives you unlimited working time to perfect the curve, but you need a lamp that cures red pigment fully. Regular polish is more forgiving for beginners because you can wipe a mistake instantly with acetone on a clean brush and start fresh. If you’re new to detail work, I’d pick regular polish; the margin for error matters more than longevity on the first few tries.
How can I stop my cherry art from fading in the sun?
Red pigment degrades under UV, so use a top coat with built-in UV inhibitors—Duri Rejuvacote 2 is one I keep in my drawer for that reason. Reapply a thin top coat every four days in summer and avoid hand sanitiser with high alcohol content right after application, because it accelerates colour washout.
My cuticles stain red during cherry nail art—how do I prevent that?
Apply a peel-off liquid latex barrier around the nail before you start painting. If pigment already bled into the skin, mix a paste of baking soda and lemon juice, work it gently with a soft toothbrush, then rinse—it lifts the red without drying the cuticle. Afterward, saturate your cuticles with oil so they don’t get raw.