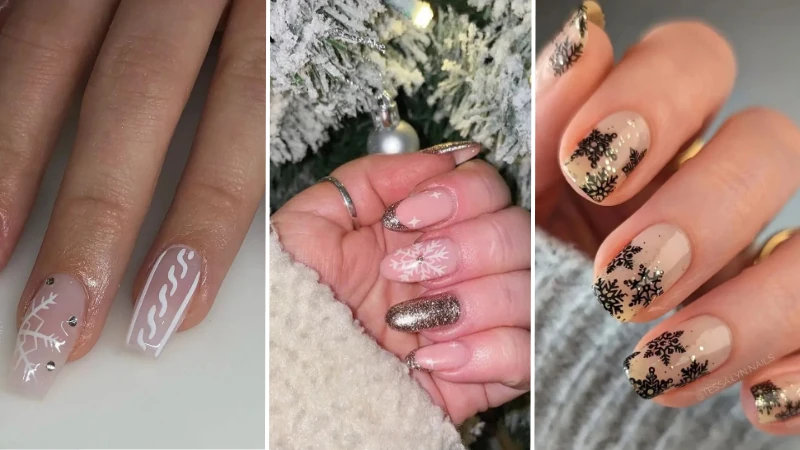
You search „Snowflake Nails“ and the gallery is stunning — crisp white lines on frosted blue, delicate silver accents, exactly the kind of refined winter nail art you want. But when you try it yourself or ask for it at a salon, the lines blur, the white looks streaky, and within three days the tips chip. The pretty pictures hide the real struggle: how to actually execute a snowflake nail design that stays crisp and lasts.
If you’ve ever wondered why your snowflake lines bleed or how to keep them looking clean on shorter nails, start with good winter nail designs for shape ideas. For petite nail beds, short winter nails prove that placement matters more than length.
43 Snowflake Nails for Every Length — Yes, Even Short Ones
These designs prove a snowflake motif flatters any nail, from a short square to a long stiletto. I’ve grouped them by length and style so you can find the exact look for your next appointment — no guesswork, no scrolling through talon‑only photos.
For Short Nails
Short nails handle snowflake art well when the placement is right. Here are eight designs that keep the shape looking long and the art from feeling cramped. For more ideas on keeping short sets sharp, look through a few short winter nail approaches that never feel like a compromise.
Short Forest & Glitter Snowflake

Square nails prove short doesn’t mean boring. These pair a deep forest green on most fingers with two accent nails in pale pink, topped with gold glitter at the tips and a hand‑painted white snowflake. The gold adds warmth against the cool green, and the glitter catches light without overwhelming the short length. Always layer a stain‑blocking base coat under dark greens — woodland shades contain stronger pigments that can tint bare nails even through a sheer layer. The polished gloss ties everything together, making this set a strong choice for a holiday lunch or a cosy weekend.
Gold Foil Snowflake on Nude

Short square nails get an elegant lift with a sheer nude base, accented by delicate gold foil flakes placed near the cuticle and a fine‑line white snowflake. The gold foil catches warm light well, adding dimension without bulk. Gold foil transfers adhere best when you press them onto a slightly tacky gel layer and seal immediately with a no‑wipe top coat — waiting too long lets them shift and tear. This design reads as refined rather than seasonally themed, so you can wear it from late November straight into January without feeling overdone. A thin gold ring on the accent finger completes the look.
Periwinkle Snowflake & Rhinestones

by @belle_voir
A square‑shaped short nail set that plays with two textures: solid light periwinkle blue on alternate nails, and a sheer nude base that holds intricate white line art — a snowflake, a hanging ornament, and tiny iridescent rhinestones. The rhinestone placement contributes a subtle sparkle without making the nail feel cluttered. Use a dot of gel top coat to anchor rhinestones, then cure for a full 60 seconds — a ten‑second flash leaves edges unsealed, and they’ll catch on fabric by day three. The blue brings a wintery punch that still feels fresh, not cartoonish. A great pick when you want festive detail that doesn’t scream holiday.
Milky White & Starry Snowflakes

by @dinas_nail
Oval nails in a short length benefit from a luminous milky white base that brightens the hand. Tiny white snowflakes sit on alternate nails, joined by delicate star accents and a fine dusting of silver glitter that reads more as frost than disco. The oval shape softens the look, making it feel gentle and clean. When working with milky base colours, apply two thin coats rather than one thick blob — a streaky finish magnifies under top coat and makes snowflake art look uneven. The star and snowflake pairing keeps the design playful yet elegant, perfect for someone who wants winter nail art that still passes as everyday polish.
Graphic Black Snowflake on Nude

A bold choice for short oval nails: a nude base carries a crisp black snowflake pattern created by stamping, with tiny gold glitter accents dotting the tips. The black‑on‑nude contrast delivers immediate impact, while the glitter softens the edge. Stamping works best when you roll the stamper gently across the plate — pressing straight down traps air and leaves gaps in the design. Short nails mean less real estate, but the stamp’s fine lines prevent the motif from dominating the nail. A glossy top coat intensifies the black and makes the gold sparkle without adding bulk. This design suits someone who likes her winter nails with a graphic, modern twist rather than traditional white.
Earthy Sweater Tones with Snowflake

Short square nails wear a cosy mix of cream, dusty rose, and mocha brown solids, with one accent nail sporting a silver glitter field and another a fine‑line white snowflake on a nude base. The subdued palette feels warm and wrap‑worthy, like your favourite winter scarf. If you’re pairing multiple shades, always do the lightest colour first — darker polish can stain the surrounding skin and make cleanup twice the work. The snowflake line art is deliberately simple: a few well‑placed spokes rather than an over‑designed motif. The result is a polished, comforting set that blends into winter wardrobes without shouting.
Silver Gradient Snowflake on Round

by @paiwaloves
Round short nails get a modern French‑meets‑gradient approach: a nude base with a focused silver glitter glow at the tips, topped by a delicate hand‑painted white snowflake. The round shape keeps the look soft and wearable, while the gradient draws the eye upward to lengthen the nail bed. Round nails chip faster at the sides if you wrap the edges poorly — run the brush along the free edge in one clean stroke after your top coat to lock everything in. The snowflake uses a few fine strokes rather than a full six‑point star, which prevents visual crowding on a small canvas. It’s a practical pick for someone who types all day.
Baby Blue Sweater & Snowflake

Short square nails combine baby blue solid colour, silver glitter accents, and a standout nail featuring a raised 3D cable‑knit texture alongside a white painted snowflake. The knit pattern adds a tactile element that immediately reads as winter cosy. 3D gel textures can shrink during curing if applied too thickly — build them in two thin layers, curing in between, to avoid cracks at the edges. The baby blue keeps it sweet but not saccharine, and the silver glitter on one nail adds just enough sparkle for a festive lift. This set works well for short nails because the texture creates depth without length.
Medium French Tips & Gradients
When you have a little more nail to play with, French tips and soft gradients give snowflakes a refined stage. These 15 medium‑length ideas prove you can stay classic or push the colour without losing an inch of elegance. If you lean into winter‑themed tips, winter French tip styles keep the base concept fresh all season.
Nude Pink Snowflake French

by @thehotblend
Almond‑shaped medium nails start with a sheer nude‑pink base and a classic white French tip. But the accent nail swaps the expected smile line for a hand‑painted white snowflake nestled at the tip, with a tiny rhinestone‑free centre. French tips on almond nails need a steady hand — use the natural smile line as your guide rather than a stencil; freehanding yields a softer, more natural curve. The glossy finish ties the clean nail to the textured sweater in the photo, showing how well this design pairs with winter knits. A refined pick for anyone who wants a festive hint without abandoning her usual polished look.
Purple Glitter Frost French

Medium almond nails get a festive lift with a sheer nude base and a deep purple‑silver glitter gradient at the tips, forming a non‑traditional French. A thin white snowflake sits on the accent nail, its fine lines cutting through the sparkle. Glitter gradients stay crisp when you apply the glitter with a makeup sponge — dab, don’t brush, to pack the pigment at the edge while keeping the base sheer. The purple adds a twist that feels more winter ball than candy cane, and the almond shape elongates the finger without needing extra length. Ideal for a holiday party where you want shimmer that doesn’t scream all‑over glitter.
Gold & Crimson Snowflake Perfection

Square medium nails mix a nude base with gold glitter French tips on some fingers and a soft white snowflake with delicate swirls on the accent nail. A touch of crimson red adds a pop of holiday colour without overwhelming the design. Mixing metallic and cream colours on the same hand can look busy — keep the non‑glitter nails solid or whisper‑soft to let the sparkle stand out. The sharp square corners give a modern edge to the otherwise romantic snowflake motif. Gold rings pick up the metallic tips, making this set feel intentional and pulled‑together for a dinner date or family gathering.
Silver Snowflake Gradient Almond

by @evessalon_
Almond‑shaped medium nails start with a nude base that transitions into a silvery glitter gradient at the tips — not a sharp line, but a soft, wintry fade. A white snowflake, painted with a fine liner brush, crowns the accent nail. The design feels airy and fresh, with the glitter catching light like sun on fresh snow. When you want the gradient to last, cap the tip with clear builder gel before the top coat — otherwise the glitter particles erode first and the fade looks patchy in a week. This set works for someone who wants a little sparkle but needs it to stay neat through keyboard days and handwashing.
Royal Blue French Snowflake

Almond nails meet icy royalty with a royal blue French tip on a nude base. The accent finger carries a tiny white snowflake at the cuticle instead of the tip, drawing the eye downward and creating a visual shift. Choosing a blue French over white brightens the nail bed and camouflages any slight tip wear better than stark white. The glossy top coat amplifies the deep blue, giving it a glass‑like finish. Two accent nails keep the look balanced and prevent the design from feeling like a novelty. A solid pick for someone who loves crisp, graphic nails with a seasonal edge that still feels chic.
Iridescent Foil Snowflake Dreams

Oval‑shaped medium nails wear a sheer, almost milky white base overlaid with iridescent foil flakes that shift from silver to soft violet in the light. A white snowflake pattern sits on top, its delicate arms almost blending into the shimmer. Foil flakes need a tacky layer to grab onto — apply them before the final top coat and press with a silicone tool, not your fingertip, to avoid lifting. The result is a dimensional, frozen look that feels ethereal rather than heavy. The oval shape keeps it soft and romantic, making it a favourite for winter brides or anyone who wants a dreamy manicure.
Metallic Red Snowflake Tips

Square medium nails make a statement with a metallic red base and a white French tip on most fingers, then throw in one accent nail fully covered in red with a white snowflake. The metallic sheen gives the red depth, so it reads as velvety rather than shiny plastic. Metallic polishes can streak — apply them over a same‑tone cream base to get a flawless, even finish on the first coat. The square shape keeps the look structured, ideal for someone who wants festive nails that still feel appropriate for the office. A single snowflake keeps the theme without tipping into holiday kitsch.
Dusty Rose Candy Cane & Snowflake

Almond medium nails blend a soft dusty rose base with white French tips on some nails and a playful mix of candy cane stripes and a snowflake on others. The dusty rose acts as a neutral that tones down the traditional red‑and‑white holiday combo. Painting stripes alongside a snowflake takes a steady hand — tape off the stripe section first, let it dry completely, then add the snowflake to avoid smudging. The combination reads as whimsical but not childish, thanks to the muted rose and the almond shape. A cheerful option for a family gingerbread‑house day that still photographs well.
Cream & Dusty Blue Snowflake French

by @thehotblend
Almond medium nails showcase an elegant two‑tone: a cream French tip on a sheer base for most nails, with two accent nails painted solid dusty blue and a delicate white snowflake. The dusty blue and cream pairing feels fresh and modern, avoiding the typical red‑white‑green holiday palette. Cream polish can look yellow in certain light — choose one with a touch of pink undertone to keep it reading as warm ivory, not aged white. The almond shape provides enough surface area for the snowflake to breathe without needing nail extensions. A refined option for winter weddings or a New Year’s brunch.
White French & 3D Knit Snowflake

Square medium nails bring a textural twist to the classic French: a sheer pink base with white tips, combined with a 3D knitted pattern on two accent nails and a snowflake painted on the pink. The raised knit texture is tactile and immediately evokes sweater weather. 3D gel art tends to yellow if exposed to direct UV too long after curing — wipe with a non‑acetone cleanser and apply an UV‑filter top coat to maintain brightness. The French tip keeps the overall shape looking crisp, while the texture adds a playful, cosy note. This set works best when you want a snowflake design that you can literally feel.
Gold Glitter French with Snowflake

Square medium nails embrace festive glamour with a sheer dusty rose base, gold glitter French tips, and a hand‑painted gold snowflake accent nail. The gold glitters shift from warm champagne to bright yellow gold as the light hits, adding depth. Gold glitter tips can overpower the nail — stop the glitter just below the natural smile line to leave an elegant nude gap that elongates the nail. A glossy finish ties the elements together, making the snowflake pop against the sheer pink. This design feels celebratory without being overly thematic, working for a New Year’s toast or a winter birthday dinner.
Gold Glitter Star & Snowflake Oval

Oval medium nails look plush with a nude pink base and gold glitter French tips, while an accent nail features a white snowflake with tiny star accents and a single rhinestone. The gold glitter is concentrated at the tips, leaving the nail bed clean. Rhinestones on short‑medium ovals can snag more easily — embed them into a soft gel layer and cap with a thick top coat so the surface stays smooth. The star accents mirror winter night skies, adding a little magic without clutter. Oval keeps the shape feminine and comfortable for daily tasks, making this a practical yet party‑ready pick.
Ruby Red French with Snowflake

Square medium nails go classic Christmas with a ruby red French tip on a nude base, paired with an accent nail featuring a white snowflake on a nude field. The red is a clean, true crimson — not too orange, not too burgundy — that suits a range of skin tones. A red French tip can bleed if your brush is overloaded — wipe the brush almost dry before drawing the smile line to keep the edge crisp. A glossy top coat gives the red depth, making it look like glass. The single snowflake adds the holiday spirit without tipping into novelty, perfect for someone who enjoys a traditional palette with a modern, minimal execution.
Blush Pink & Copper Glitter Snowflake

Square medium nails combine a blush pink base with copper glitter French tips — a warmer, more unexpected take on metallic. Two accent nails hold a white snowflake line drawing, its delicacy contrasting with the chunkier glitter. Copper glitter reflects yellow‑orange tones, so pair it with cool‑toned pinks to avoid a muddy effect under warm indoor light. The square shape provides a flat canvas that makes the French smile line pop, and the snowflake’s fine lines keep the design from looking heavy. A gold ring picks up the copper shimmer well, rounding out a refined festive look for dinner parties.
Black Glitter French with Snowflake

Square medium nails go dark with a black glitter French tip on a nude base, plus an accent nail featuring a black snowflake and tiny dots. The black‑and‑nude palette is dramatic yet clean, and the glitter adds texture that lifts the dark colour from harsh to festive. Black polish over nude can chip along the smile line — seal the join with a fine line of clear top coat to lock both colours together. The snowflake on the accent nail uses negative space, with the nude base showing through between spokes, keeping the design light. An edgy option for a winter concert or a New Year’s Eve party that goes past midnight.
Medium Colour & Texture
These ten medium designs move away from French tips into full‑on colour, chunky textures, or all‑over shine. They prove a snowflake can pop just as brilliantly against a solid backdrop as it does against a sheer one.
Navy & Pale Pink Snowflake Decal

Square medium nails split between deep navy blue and pale pink, connected by a soft glitter gradient that runs from the cuticle toward the tip. A white snowflake decal on the pink accent nail adds the winter motif without hand‑painting. Decals lift at the edges if they don’t touch the base coat — apply them while the base is still slightly tacky and seal with a thick top coat immediately. The navy brings a midnight sky feel, countering any preciousness from the pink. The square shape gives enough width for the decal to sit flat, avoiding bubbling. A solid choice for someone who wants the snowflake look without the pressure of drawing it herself.
Chrome & Glitter Snowflake Almond

by @belle_voir
Almond medium nails feel like a frozen mirror: a full nail of silver glitter and iridescent chrome reflects light, while a white snowflake painted on top adds structure. The chrome finish amps up the wintery theme, making each nail look like a miniature icy pool. Chrome powder applies streak‑free only on a perfectly smooth, non‑tacky gel surface — any stickiness will grab powder unevenly and ruin the mirror effect. A glossy top coat seals the design without dulling the shine. The almond shape softens the extreme gleam, keeping the look elegant rather than aggressive. Best worn for a night out where you want your nails to catch every light.
Cherry Red & Gold Foil Snowflakes

Square medium nails bring holiday joy with bright cherry red solid colour on most fingers, plus two accent nails in soft baby pink. Those accents feature a white snowflake, gold foil flakes, and tiny white polka dots, mixing texture with pattern. Gold foil flakes look intentional when placed in a cluster rather than scattered — use a toothpick to guide them into a small group near the snowflake centre for the best effect. The red is bold and glossy, while the pink accents save the set from being overwhelming. This playful, feminine combo suits a casual Christmas gathering or a gift‑wrapping day when you want nails that cheer you up.
Magenta Chrome & Cozy Knit

Coffin‑shaped medium nails split between a dark magenta chrome and a dusty rose base with raised cable‑knit texture. A white snowflake sits on one rose nail, tying the winter theme together. The chrome reflects deep purple‑red tones, creating a striking contrast against the matte‑looking knit. Coarse chrome powder can scratch if you buff too hard — use a light, circular motion and let the gel’s residual tack do the gripping work. The coffin shape makes the knit pattern more visible and gives the design a modern, edgy feel. A true statement set for someone who wants texture, colour, and shine in one manicure.
Peach & Gold Snowflake Softness

Almond medium nails lean into warmth with a soft peach base and delicate hand‑painted white snowflakes accented by tiny flecks of gold foil. The peach flatters a range of skin tones and feels less expected than nude pink. Gold foil can turn green if it reacts with certain top coats — always use a non‑porous, soak‑off gel top coat over foil to prevent oxidation. The snowflake lines are thin and feathery, almost sketching, which keeps the design light and airy. The almond shape adds femininity without looking dramatic. Perfect for a late‑November wedding or any occasion where you want understated seasonal charm that still feels fresh.
Dusty Rose Gold Snowflake Sophisticate

by @belle_voir
Oval medium nails pair a solid dusty rose base with gold glitter accents and a fine‑line white snowflake. The dusty rose is a quiet, romantic colour that keeps the gold from feeling too brash. Fine‑line snowflake art looks professional only if your brush is tip‑clean — wipe it on a solvent‑free pad after every stroke to prevent colour mixing. The oval shape helps the nail bed appear longer, while the snowflake’s thin spokes avoid heaviness. The gold glitter concentrates near the cuticle, drawing the eye upward. A lovely choice for someone who wants a subtle nod to winter without obvious holiday symbols, perfect for a date night or a cosy dinner.
Sheer Nude with Rhinestone Snowflake

by @bygrayce
Coffin medium nails show a sheer nude base with silver glitter concentrated at the tips and iridescent snowflake decals layered with a tiny cluster of rhinestones. The rhinestones add a luxe, diamond‑like sparkle. Rhinestones on a coffin tip can catch on sleeves — apply a small ball of clear gel around each stone’s base and cure thoroughly to create a smooth, snag‑free slope. The decals ensure the snowflake shape is precise, even for a novice. The coffin shape elongates the fingers and makes the design feel current. An excellent pick for a holiday gala when you want your nails to compete with your cocktail ring.



e.l.f. Halo Glow Liquid Filter
A glow-enhancing complexion booster for soft-focus makeup looks.
Check Price on AmazonAs an Amazon Associate, Lady Lana Beauty earns from qualifying purchases.
Off-White & Silver Glitter Frost

Square medium nails use a creamy off‑white base on most fingers, with one accent nail covered in silver glitter and another featuring a tiny white snowflake. The off‑white is warmer than stark white, so it complements a wider range of winter outfits. Off‑white polish can appear streaky if not shaken well — roll the bottle between your palms for 30 seconds before each use to homogenise the pigment. A thin silver glitter accent adds the right amount of shimmer without stealing focus from the snowflake. The square shape offers a flat surface that makes the snowflake lines appear extra crisp. Great for someone who loves a clean, bright winter manicure.
Red Glitter Snowflake All-Over Sparkle

by @learnahstarbuck_nailartist
Oval medium nails fully embrace the holiday season with a vibrant red glitter polish covering each nail, overlaid with a white hand‑painted snowflake on the accent nails. The red glitter is fine enough to create an almost liquid‑metal effect. Red glitter removal can be brutal — soak a cotton pad with an acetone‑based remover, press it onto the nail, wrap with foil, and wait ten minutes to let the glitter slide off without scraping. The oval shape softens the intense sparkle, making it wearable beyond the 25th. This design is for the woman who wants maximum impact and doesn’t mind a little extra removal effort for all that shine.
White Swirls & Snowflake Elegance

Oval medium nails combine a white solid colour, a clear base with silver glitter and soft white swirls, and a delicate snowflake motif. The clear‑based nails create negative space, which keeps the set modern and prevents visual overload. Negative space designs work best on natural nails that are stain‑free — apply a whitening base coat a few days before to even out any nail bed discolouration. The swirls add movement, and the snowflake gives the winter nod without feeling literal. Oval provides a gentle, classic frame. This set is a go‑to for someone who wants festive nails that still feel fresh and editorial, not like a craft project.
For Long Nails
Long lengths turn a snowflake into a canvas statement. These ten designs use the extra space for bold ombré, stiletto‑worthy texture, and full‑on glamour. Shape matters more than length when placing a snowflake — square and coffin shapes give you a flat plane for crisp lines, while almond and stiletto need curved art to stay flattering.
Pink Ombré Snowflake on Long Almond

Long almond nails wear a full bubblegum pink ombré that fades from a deeper pink at the cuticle to a lighter tip. A white snowflake sits near the cuticle, drawing the eye down and balancing the length. Ombré on long nails can drag the eye down — place the snowflake high on the nail to bring focus back and create harmony. The pink is playful yet polished, and the gel finish gives a glassy shine. Almond elongates the hand already, so the snowflake acts as a grounding detail. This set feels youthful and pretty, perfect for a holiday party where you want to show off the length without it feeling overdone.
Metallic Silver Snowflakes on Bubblegum

Long almond nails in a solid bubblegum pink get a glamorous update with metallic silver snowflake designs of varying sizes. Small silver dots scatter around the snowflakes, creating a constellation effect. Metallic polish thickens quickly — add a drop of polish thinner before you start to keep the lines flowing smoothly. The length gives the designer room to vary the snowflake sizes, avoiding a repetitive look. The silver on pink reads as modern and feminine, not juvenile. Close up, the metallic accents catch light like jewellery, making this a strong contender for a New Year’s Eve set that complements silver jewellery.
Long Almond French with Snowflake Shimmer

by @amaryllis
Long almond nails look high‑end salon refined: a sheer nude pink base, bright white French tips, and a subtle shimmer. An accent nail replaces the tip with a hand‑painted snowflake that spreads across the tip area. Long almond nails are prone to tip chipping — reinforce the free edge with a thin layer of builder gel under the French for impact protection. The gold ring in the photo hints at how the set pairs with warm‑toned jewellery. The shimmer softens the white, preventing it from looking plastic. An elegant choice for a winter bride or someone who wants a special‑occasion manicure that stays classy.
Stiletto Sweater Knit & Snowflake Extravaganza

Long stiletto nails are a showstopper: they combine glossy white French tips, sheer pink bases, baby blue snowflake art, a 3D cable‑knit texture on one nail, and a dash of glitter. The variety of textures makes this set a winter lookbook in a single hand. Stiletto nails can warp if gel layers are too thick near the point — taper the gel application so the tip remains sharp but strong. The snowflake appears on the pink base, its white petals crisply defined. The gold rings add warmth. This is for the woman who treats her nails as an accessory and isn’t afraid of a little drama — ideal for a holiday concert or a gala.
Milky White Stiletto with Crystal Snowflake

Long stiletto nails in a translucent milky white provide a dreamy canvas. A fine‑line white snowflake is drawn on each nail, with a tiny silver rhinestone at the centre. The stiletto shape makes the nails look impossibly elegant. On long stilettos, rhinestones must be placed slightly off the highest point — the centre bows outward and constant pressure can crack them. Offset by a millimetre for safety. The milky base softens the sharp tip, giving a romantic, ethereal feel. The silver rhinestones twinkle with each movement. Wear these when you want a high‑impact, editorial look that reads as luxurious rather than aggressive — perfect for a formal winter event.
Baby Blue Matte French & Texture

Long almond nails surprise with a soft baby blue solid colour, a pale pink base with blue French tips, and a 3D textured design. One accent nail shows a white snowflake decal, while another has a raised pattern. The matte finish gives the designs a velvety, modern feel. Matte top coat on textured nails can look dusty within days — wipe with a gentle alcohol‑free cleanser daily to keep the finish fresh without adding shine. The matte surface also makes the snowflake decal pop in an interesting way because it lacks the usual glare. This set feels like a cosy cashmere sweater translated onto nails, ideal for a relaxed winter weekend yet still statement‑worthy.
Ombré Stiletto Snowflake with Gems

by @nailsbytiffany_venusbeaute
Long stiletto nails feature a soft nude‑to‑white ombré that elongates the nail even further. A white snowflake is painted on the accent nail, with tiny silver rhinestones catching the light. The ombré is seamless, creating a blurred transition. Ombré on acrylics is best applied with an airbrush or a layered sponge — brush overlapping can leave hard streaks on such a large canvas. The stiletto shape demands precision: the snowflake sits right where the white begins, anchoring the eye. The rhinestones add sparkle without cluttering the tapering tip. A go‑to for a bride or a black‑tie event, where the nails become a conversation piece.
Pearl White French Snowflake Long Almond

by @thehotblend
Long almond nails glow with a pearlescent off‑white base and classic white French tips. One nail bears a delicate snowflake, its lines so thin they almost fade into the pearl sheen. The pearlescent quality adds a subtle opalescence that shifts in different light. Pearl polishes can be sheer — build three thin coats for opacity, then seal with a high‑gloss top coat to magnify the lustre. The length lets the French tip extend dramatically, but the snowflake keeps the design grounded. Wear these when you want to feel polished and serene, perhaps for a winter wedding or a gallery opening where understated luxury wins.
Forest & Black Sweater Knit Long Square

Long square nails go for high drama with a matte forest green and black colour scheme. Some nails feature a raised cable‑knit texture, others a black French tip on nude with a white snowflake, and some solid black glitter. Matte nails show oil marks instantly — always apply cuticle oil before the matte top coat, not after, to keep the finish pristine. The square shape provides a broad canvas for the knit pattern, and the snowflake adds a delicate contrast to the heavy textures. A set for the woman who loves dark, moody manicures but still wants a seasonal touch that feels like a fashion choice, not a gimmick.
Coffin Knit & Rhinestone Snowflake Luxe

Long coffin nails combine everything: a nude base, white French tips, silver glitter, a 3D cable‑knit texture, rhinestones, and a hand‑painted snowflake. This maximalist design is pure winter luxury. Balancing multiple techniques on one nail is tricky — work on one nail at a time and cure between each added element to prevent smudging the earlier work. The coffin shape gives the French tip a sharp edge, while the knit texture adds dimension on a separate nail. Rhinestones sit near the snowflake centre, catching light without overpowering. Perfect for the woman who books a long salon appointment and leaves with nails worthy of a magazine cover.
Why Your Snowflake Lines Bleed (and the 3-Step Fix Your Nail Tech Won’t Share)
The formula factor: Most white polish separates into a watery mess the moment you load a detail brush. The pigment load varies wildly between brands, and the ones that look opaque in the bottle often spread the second they touch the nail. I mix a drop of white gel paint with a high-pigment white polish straight on a palette — it creates a consistency that stays put, with just enough glide for a single, crisp stroke. No more puffy blobs that dry like correction fluid.
Brush anatomy matters: Fine brushes are not all the same. A long, flexible striper brush sounds delicate, but the hairs splay when polish gets thick, giving you a feathery edge instead of a clean line. I reach for a short, stiff #00 rigger with a tapered tip. It holds less product and bends less, so every spoke starts and stops exactly where you want it. For snowflakes, that stiffness is everything.
The “anchor dot” method: Starting a line mid-air almost guarantees a shaky blob at the centre. Before you paint any spoke, place a tiny dot of polish exactly where you want the line to end — near the tip or along the side wall. Then pull the brush from the snowflake centre outward toward that anchor. The line thins naturally as you lift, and the beginning stays sharp because you’re not guessing the landing point.
Flash-cure between layers: When you build a snowflake in gel, a single 60-second cure after the whole design often leaves floating edges. Cure each element — centre dot, then three main spokes, then the branching details — for 10 seconds apiece. A partial cure locks the layer just enough that the next one won’t smear. It sounds fiddly, but once you settle into the rhythm it adds maybe three extra minutes to the whole manicure.
Why acetone ruins everything: Dipping your detail brush into acetone mid-design feels like the tidy move. It actually introduces solvent and humidity into the fresh polish, thinning it further and guaranteeing bleeding. Instead, keep a lint-free pad dampened with a slow-evaporating alcohol blend — 70% isopropyl mixed with a drop of glycerin works. Swipe the brush clean on that, dab once on a dry patch, and reload. The polish stays thick and obedient.
The Gel Layering Secret for Snowflake Nails That Outlast Winter
Builder gel as a sealant: Most tutorials say a glossy top coat is enough to protect your snowflake art. I’d argue that misses the texture problem — every raised spoke catches on gloves, coat sleeves, and towels. A thin layer of soak-off builder gel applied before the final top coat encapsulates the design without rounding off the details. It flows into the crevices, cures hard, and prevents the chip that starts at the highest point of a snowflake arm. Your winter nail art stays crisp, not shredded.
Edge-sealing on textures: Standard top coats naturally pull away from dimensional edges as they cure. You end up with micro-exposed ridges that lift first. Before the full top coat, I run a precision liner brush damp with no-wipe top coat along each snowflake arm — effectively painting a rim of sealant right where the gel meets air. It takes an extra minute per nail, but the difference at day seven is night and day.
The matte-to-gloss deception: Matte top coats wear faster and show dull patches sooner. If you want that frosted finish, build all your durability layers — base, colour, art, builder gel — then apply a high-gloss top coat and cure fully. The matte coat goes on last, thin and sacrificial. When it begins to look patchy after a week, the gloss underneath still holds the design intact. You get the look without sacrificing longevity.
Cold-weather polymerization: A chilly room can prevent gel from curing completely, especially under dense white pigments. Under-cured gel feels sticky underneath and lifts within days. After the full curing cycle, I flash the nails again for an extra 30 seconds. This second pass reaches any shadowed areas beneath the opaque snowflake layers. It costs nothing in materials and spares you the disappointment of peeling art on a snowy morning.
Oil doesn’t just shine: The moment your top coat cools, massage cuticle oil into the nail plate and lateral folds. Gel is rigid, and daily handwashing makes it brittle. Oil penetrates the molecular structure, keeping it flexible enough to move with your natural nail instead of cracking at the stress points. Twice a day is not pampering — it is physics. In winter, when indoor heating dries everything, this habit doubles the life of any festive manicure.
Snowflake Placement Rules That Flatter Every Nail Shape (Yes, Even Shorties)
Vertical illusion on short nails: Most guides show a symmetrical snowflake planted dead-centre. I’d argue that’s a mistake for shorter lengths, because it widens the nail visually and makes the overall hand look stumpy. Instead, place a single asymmetric snowflake near the tip, with one long spoke pointing down the nail plate. This vertical line draws the eye and creates an elongating effect that works brilliantly on squoval and round short nails — the shapes most women actually live with. If you want extra proof, look at how strategic placement on short winter nails changes the entire look.
Coffin/ballerina apex trick: Coffin nails have a flat, squared-off tip, and the eye naturally follows the straight side walls. A snowflake positioned directly in the middle of the nail bed often appears squashed when you look at your hand head-on. Shift the main design slightly off-centre toward the high point — the curved apex of the nail around the stress area. This keeps the snowflake from stretching or flattening with the flat tip’s geometry. On stiletto nails the same rule applies: tuck the art closer to the cuticle half, where the surface is wider and more forgiving.
Almond curves need miniature art: Almond shapes taper to a soft point. Hard, straight-line geometric snowflakes — the kind with rigid hexagonal spokes — sit awkwardly against those curves. Instead, use snowflakes with organic, slightly curved arms, like a Gerber daisy stencil or freehand petals. The soft movement echoes the nail’s own silhouette, and the whole hand reads more cohesive. For oval nails, the same principle holds: rounded elements keep the design from fighting the nail shape.
Negative space is your friend: On petite nail beds, a dense snowflake can look heavy and make the nail appear even smaller. Build the snowflake using tiny dotted arches around a negative-space centre. The eye fills in the gaps and perceives the design as airy and larger than it is. This trick works especially well on narrow almond or oval nails, where every millimetre of visible nail bed matters.
Rhinestone points must point out: If your snowflake includes a central stud, orient its facets so one sharp point aims toward the free edge of the nail. This tiny directional cue guides the viewer’s eye outward, extending the nail visually. A random orientation — with a flat facet facing the tip — truncates the effect and can make the whole design feel cut off. On square or coffin tips, this detail is the difference between “cute but cramped” and clean, chic minimalism.
The Nail-Friendly Snowflake Removal Routine That Prevents Peeling
Abandon the pure acetone soak: Wrapping your whole nail in an acetone-soaked cotton ball is harsh and pulls moisture from the entire nail plate. For densely painted snowflake nails, soak a lint-free pad in an acetone remover that already includes glycerin or a similar additive. Place the pad only over the nail art itself — not wrapping the free edge or side walls — to target the design without dehydrating the nail you’re trying to protect.
Warmth shortens exposure: Cold acetone works slower, so you end up leaving the foil on longer. Warm a rice bag in the microwave and rest your wrapped nails on it during the soak, or use a gentle hand warmer. Warmer acetone breaks down gel and glitter about four minutes faster. Less soak time means less chance of the nail plate absorbing solvents and peeling later.
The flake-off check: After ten minutes, unwrap one finger and use an orangewood stick to push horizontally across the snowflake, from sidewall to sidewall. Never lever upward from the cuticle — that lifts natural nail layers along with the art. Horizontal pressure cracks the bond between the gel and the base coat, and the design flakes away in whole pieces without scraping.
Keratine rescue immediately after: The removal process often strips the tiny ridges that help polish adhere. Before you even think about buffing, swipe a nail-strengthening peptide serum over the bare nails. Then do one gentle pass with a 240-grit buffer — nothing coarser. This preserves the surface integrity while smoothing just enough for the next colour.
The 48-hour naked rule: Once the polish is off, give your nails a two-day break with nothing but keratin oil massaged in twice daily. This rebalances moisture levels, and the plates recover their natural flexibility. When you go back for your next fresh january nail look, the base coat will grip evenly and wear better — no thin spots, no early peeling. The short wait is the cheapest way to reset.
[Bonus Info] The $3 Tool That Makes Perfect Snowflake Dots (No Artistic Talent Required)
The right tool: A double‑ended metal dotting tool with 0.8mm and 1.2mm tips costs next to nothing and delivers uniform dots that no brush can match.
I’ll take a clean dot over a shaky brush line any day — and this tool gives you that precision without the wobble. The metal ball end stays completely round even after years of use, unlike plastic tools that wear uneven. For snowflake centres and spoke ends, the 0.8mm side creates a tiny, delicate dot that reads intentional, not accidental.
Loading it for a crisp dot: Dip only the very tip into your polish, then dab once on a palette or a silicone mat to shed the excess.
If you load the whole ball, the dot will spread into a shapeless smear. The weight of the tool alone transfers the polish when you touch the nail — you never need to press. Pressing flattens the dot and leaves a ring, which instantly ruins the airy snowflake look you’re going for.
Fixing a wobble mid‑design: When a painted line has a thick spot, immediately use the clean 0.8mm end to gently scoop away the wet bulge.
This only works while the polish is still wet, so keep the dotting tool bare on that side and move fast. The tiny sphere lifts the extra pigment without disturbing the crisp edge you just laid down. It’s like an undo button for those tiny slip‑ups that used to force you to start the whole nail over.
Hidden texture maker: Dip the tool in clear matte top coat and lightly stamp tiny dots across a glossy snowflake for a frosted, hand‑painted dimension.
This simple trick turns a flat sticker‑like design into something that looks textured and expensive. The matte dots catch light differently than the gloss underneath, so the snowflake reads as layered, even though you only used one top coat finish. No extra powders or sponges needed.
Storing it so the tip stays perfect: Always recap the 0.8mm end first, and keep the tool in a rigid pencil case, never loose in a drawer.
One accidental knock against a hard surface and that precision tip bends microscopically, and from then on every dot comes out oval. A bent tip is impossible to fix — you’ll need a new tool. Treating it like the tiny precision instrument it is means you’ll get years of identical, flawless dots out of the same £3 investment.
FAQ
Will white snowflake polish stain my natural nails if I skip a base coat?
Yes, and it’s not subtle. White polishes are loaded with titanium dioxide for opacity, and that pigment can leave a yellow tint on porous bare nails — sometimes after just one wear. Always use a stain‑blocking base coat, preferably one formulated for high‑pigment art, even if you’re only doing a quick accent nail.
How do I ask for snowflake nails at a salon without sounding like I want holiday‑themed student art?
Say: “I’d like a minimalist winter nail with a single fine‑line snowflake on an accent nail, in [your colour palette], using gel to keep the lines crisp. I want it to read refined, not literal snow.” Mentioning “fine line” and “accent” steers the tech toward delicate hand‑painting and away from chunky glitter or cartoon motifs. Bring a photo of exactly the kind of refined design you mean — minimalist winter nails with a single focal point are far easier to communicate with a visual.
Can I combine snowflakes with other winter symbols without it looking cluttered?
Yes, but stick to one visual language. If your snowflakes are fine‑lined and delicate, pair them only with tiny stars or simple pine branches drawn with the same brushstroke weight. Using chunky snowflakes next to detailed reindeer or heavy glitter creates visual chaos. Negative space between each tiny element keeps the design airy, not craft‑table.
My hands tremble slightly—is there any hope for doing this design myself?
Absolutely. Use a stamping plate for the complex snowflake base, then hand‑paint one or two accent lines only where you feel most steady. The stamp gives you the intricate shape you can’t freehand, and your own small touches camouflage the stamped pattern so it looks custom — not copied from a kit. This hybrid method works even on days when your hands aren’t fully cooperating.
Which nail shape makes a snowflake design look most refined?
Short square or squoval: Most practical for typing and daily wear; place the snowflake off‑centre near the tip, with one spoke pointing down to elongate. Almond: Elegant and lengthening, but the free edge needs gel reinforcement to hold up under a detailed design — a single asymmetric snowflake near the cuticle looks especially flattering. Coffin/ballerina: The flat apex can distort a centred snowflake, so position yours slightly off‑centre toward the high point for a balanced front view. If you’re working with shorter lengths, short winter nails can still carry a snowflake well when you follow these placement rules.
Do gel snowflake nails cost more than a standard gel manicure?
Usually yes, by £8–£20 per nail with detailed art, because it’s timed labour. Book a “nail art add‑on” appointment and bring a precise photo; salons often charge by complexity, not per snowflake. Ask upfront if they have a set fee for fine‑line work to avoid surprise charges at the till.
Are snowflake nails only appropriate for December, or can I wear them all winter?
Snowflakes are a winter motif, not a Christmas one, so they work well from late November through February if you choose icy, non‑holiday tones. Stick to metallic silver, champagne, soft white, or dusty blue backgrounds, and avoid pairing them with red, green, or Santa-inspired accents. That subtle palette shift stretches the design’s wearability for two extra months.